
Objectives
- Understand the concept of LVM
- Create a Logical Volumes
- Display Logical Volumes
- Delete a Logical Volumes
- Expand a Logical Volumes
- Shrink a Logical Volumes
- Use Logical Volumes snapshots
LVM
Logical Volume Management is a mechanism whose purpose is to abtract the filesystem from the device, thus allowing a filesystem to span across several devices and partitions.
The most important operations that can be accomplished within a filesystem with LVM are
- Extend a filesystem
- Shrink a filesystem
LVM Structure
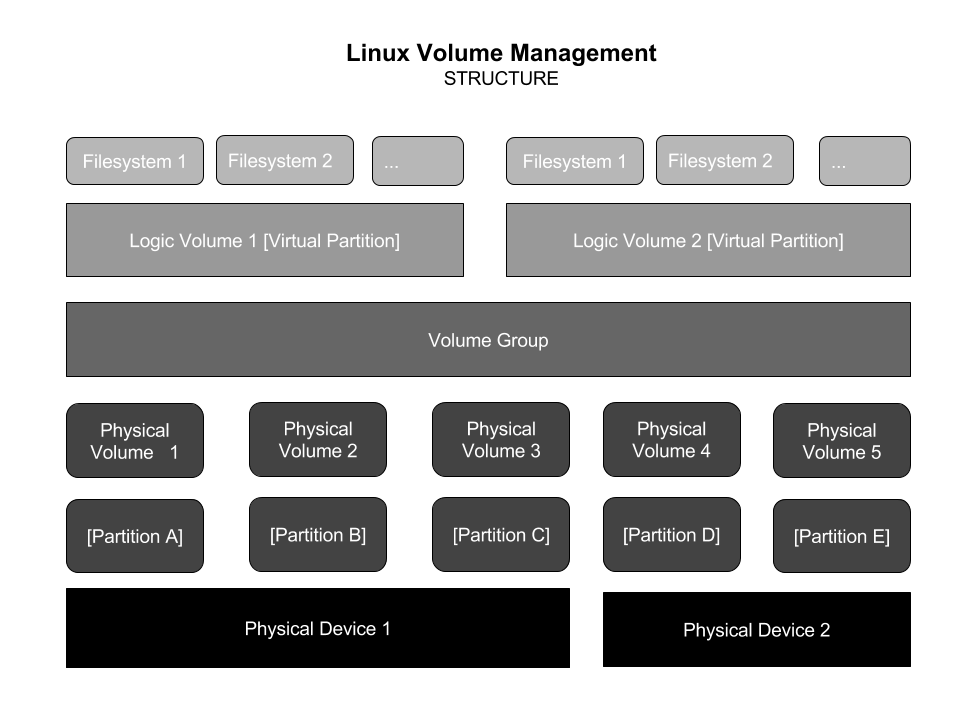
Volume Groups
These are virtual components that groups physical volumes to make a larger space (that will latter be filled by Logical Volumes). Space in the volume group is divided into extends of 4 MB by default (This size can be changed when the volume groups is being allocated).
Utilities to manage volume groups
- vgcreate
- Creates volume groups
- vgextend
- Adds to volume groups
- vgreduce
- Shrink volume groups
Utilities to manage physical volumes
- pvcreate
- Converts a partition to a physical volume
- pvdisplay
- Shows the physical volumes being used
- pvmove
- Moves data from one physical partition to other physical partition within the same volume group
- pvremove
- Remove a partition from a physical volume
For more information
$ man lvm
Logical Volume Utilities
- lvcreate
- Allocates logical volumes within a volume group, the size can be specified in bytes or number of extends (by default an extend has 4MB)
- lvdisplay
- Show the available logical volumes
Steps to configure a new Logical volume
- Partition the devices
- Create the physical volumes from the previous partitions
- Create a volume group from the physical devices
- Allocate a logic volume within the volum group
- Format the logic volume
- Mount the logic volume (also if needed update /etc/fstab as needed)
Creating a Logical Volume
Assuming we have the partitions /dev/sdb1 and /dev/sdc1
1. Create a physical volume
$ sudo pvcreate /dev/sdb1
2. Create the second physical volume
$ sudo pvcreate /dev/sdc1
3. Create the Volumen Group from the physical volume /dev/sdb1
$ sudo vgcreate -s 16M vg /dev/sdb1
4. Extend the Volume Group created with the physical volume /dev/sdc1
$ sudo vgextend vg /dev/sdc1
5. Create a logical volume, within the volume group vg
$ sudo lvcreate -L 50G -n mylvm vg
6. Format the created logical volume, it means create the filesystem within the logical volume
$ sudo mkfs -t ext4 /dev/vg/mylvm
7. Create a directory where we will mount the filesystem
$ sudo mkdir /mylvm
8. Mount the filesystem in the mylvm directory
$ sudo mount /dev/vg/mylvm /mylvm
9. In order to persist the filesystem mount, write this on the /etc/fstab
/dev/vg/mylvm /mylvm ext4 default 0 0
Display Physical Volumes, Group Volumes and Logical Volumes information
The next utilities are used to display information (when there is not parameter any of the following commands will display all physical, group or logic volumes)
- pvdisplay
-
$ sudo pvdisplay
-
$ sudo pvdisplay /dev/sda5
-
- vgdisplay
-
$ sudo vgdisplay
-
$ sudo vgdisplay /dev/vg0
-
- lvdisplay
-
$ sudo lvdisplay
-
$ sudo lvdisplay /dev/vg0/lvm1
-
Resizing Logical Volumes
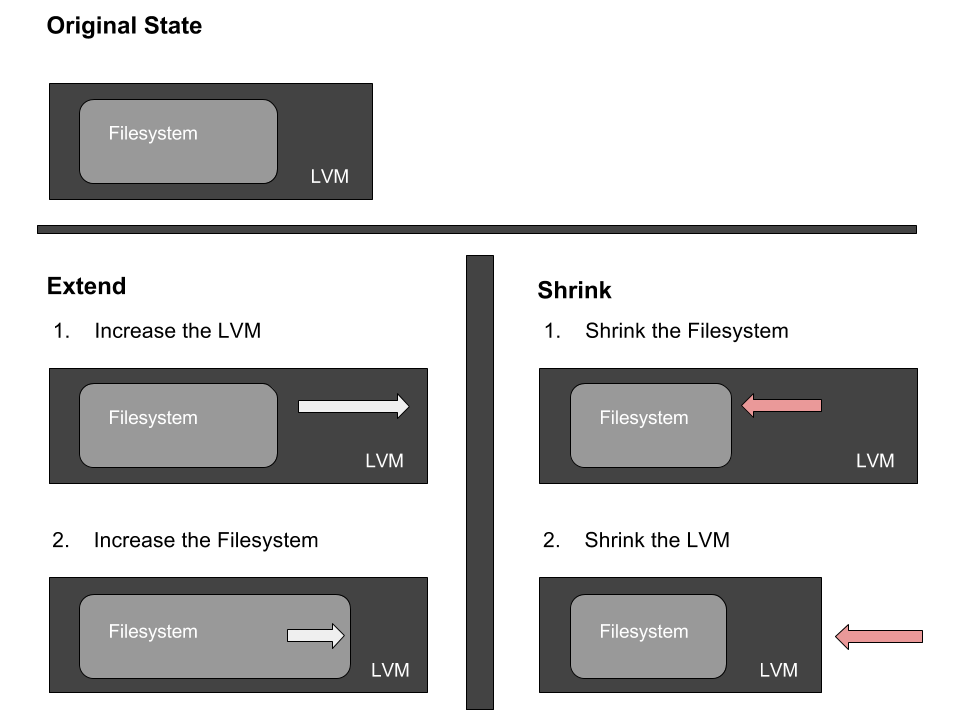
Extend Logical Volumes
Assuming an ext4 filesystem which should grow 500 M
1. Extend the LVM where the filesystem lives
$ sudo lvextend -L +500M /dev/vg/mylvm
2. Extend the filesystem
$ sudo resize2fs /dev/vg/mylvm
Shrink Filesystem
Assuming that we want our filesystem to have a new size of 200MB
1. Umount the filesystem
$ sudo umount /mylvm
2. Make a preventive filesystem check
$ sudo fsck -f /dev/vg/mylvm
3. Resize the filesystem
$ sudo resize2fs /dev/vg/mylvm 200M
4. Resize the LVM to 200MB
$ sudo lvreduce -L 200M /dev/vg/mylvm
5. Mount the filesystem again
$ sudo mount /dev/vg/mylvm22
Note: Alternative ways to resize an lvm (even faster)
Extend
$ sudo lvextend -r -L +100M /dev/vg/mylvm
Reduce
$sudo lvreduce -r -L -100M /dev/vg/mylvm
Reduce a Volume Group
1. Free a Physical Volume, moves data stored in this physical volume to other physical volumes in the volume group
$ sudo pvmove /dev/sdc1
2. Substract the physical volume (/dev/sdc1) from the the Volume Group (vg)
$ sudo vgreduce vg /dev/sdc1
LVM Snapshots
It is an exact copy of an existing logical volume. Snapshots only use space to store deltas (changes on the state of the Logical Volume)
- When the original logical volume changes, original data blocks are copied to the snapshot
- If data is added to the snapshot, it is stored only there
Create a snapshot of an existing Logical Volume (/dev/vg/mylvm)
$ sudo lvcreate -l 128 -s -n mysnap /dev/vg/mylvm
Create a directory and mount the snapshot on such directory
$ mkdir /mysnap

$ mount -o ro /dev/vg/mysnap /mysnap
To remove the snapshot
$ sudo umount /mysnap $ sudo lvremove /dev/vg/mysnap
Lab 16.1 Logical Volumes
We are going to create a logical volume using two 250 MB partitions. We are going to assume you have real partitionable disk space available
1. Create two 250MB partitions of type logical volume (8e)
2. Convert the partitions to physical volumes
3. Create a volume group name myvg and add the two physical volumes to it. Use the default extended size
4. Allocate a 300MB logical volume name mylvm from volume group myvg
5. Format and mount the logical volume mylvm at /mylvn
6. Use lvdisplay to view information about the logical volume
7. Grow the logical volume and corresponding filesystem to 350MB.
Solution
1. Execute:
$ sudo fdisk /dev/sda
using whatever hard disk is appropriate, and create the two partitions. While in fdisk, typing t will let you set the partition type to 8e. While it doesn’t matter if you don’t set the type, it is a good idea to lessen confusion. Use w to rewrite the partition table and exit, and then
$ sudo partprobe -s
or reboot to make sure the new partitions take effect.
2. Assuming the new partitions are /dev/sdaX and /dev/sdaY:
$ sudo pvcreate /dev/sdaX
$ sudo pvcreate /dev/sdaY
$ sudo pvdisplay
3. $ sudo vgcreate myvg /dev/sdaX /dev/sdaY
$ sudo vgdisplay
4. $ sudo lvcreate -L 300M -n mylvm myvg
$ sudo lvdisplay
5. Execute
$ sudo mkfs.ext4 /dev/myvg/mylvm
$ mkdir /mylvm

$ sudo mount /dev/myvg/mylvm /mylvm
If you want the mount to be persistent, edit /etc/fstab to include the line:
/dev/myvg/mylvm /mylvm ext4 defaults 0 0
6. Execute
$ sudo lvdisplay
7. Execute
$ df -h $ sudo lvextend -L 350M /dev/myvg/mylvm $ sudo resize2fs /dev/myvg/mylvm $ df -h
or
$ sudo lvextend -r -L +50M /dev/myvg/mylvm